Lab assignments
Lab 1 - Primary-backup (Due: 9/22)Lab 2 - Raft (Due: 10/20, 10/27, 11/6)
Lab 3 - MapReduce (Due: 11/22)
(project alternative) Lab 4 - Fault-tolerant Key-value (Due: 12/4)
(project alternative) Lab 5 - Sharded key-value (Due: 12/15)
Acknowledgements
Labs 2-5 are originally developed as part of MIT 6.824.Collaboration Policy
See hereSetting up Virtual Box
We will grade your labs on an Ubuntu 18.04 machine. We recommend you do the labs in the the class virtual machine (based on Ubuntu 18.04).If you wish to use your own existing Linux-based desktop or laptop instead of the class virtual machine, the labs might just work, but note that we won't be able to help you debug any problems you might have.
For a basic virtual machine setup, perform the following four steps:
- Step 1. Install VirtualBox. Download the Virtualbox virtual machine monitor 6.0.10. If your laptop runs MacOS, download this. If your laptop runs Windows, download this.
- Step 2. Download class virtual machine image. Download this file. This file is fairly large (>1.8GB), so you need to be patient. We have also put a copy of the image on Dropbox here.
- Step 3. Launch Virtualbox and import class VM image. On the Virtualbox application toolbar, under the Menu item "File", click on "Import appliance...", and choose the previously downloaded lubuntu18.04.ova file when prompted.
- Step 4. Enable multiple processors for the class VM. In virtualbox, goto Settings > System > Processor, you can change the number of CPUs to 4.
- Step 5. Launch Lubuntu Linux and start a terminal. After importing, start the virtual machine named "lubuntu" and log in using the username and password given in Piazza). Once you are logged in, start a terminal once you logged in by clicking the "LXterminal" icon on the desktop (alternatively, use the short-cut key combination "Ctrl-Alt-t").
For more advanced tune-ups to help your productivity, do the following:
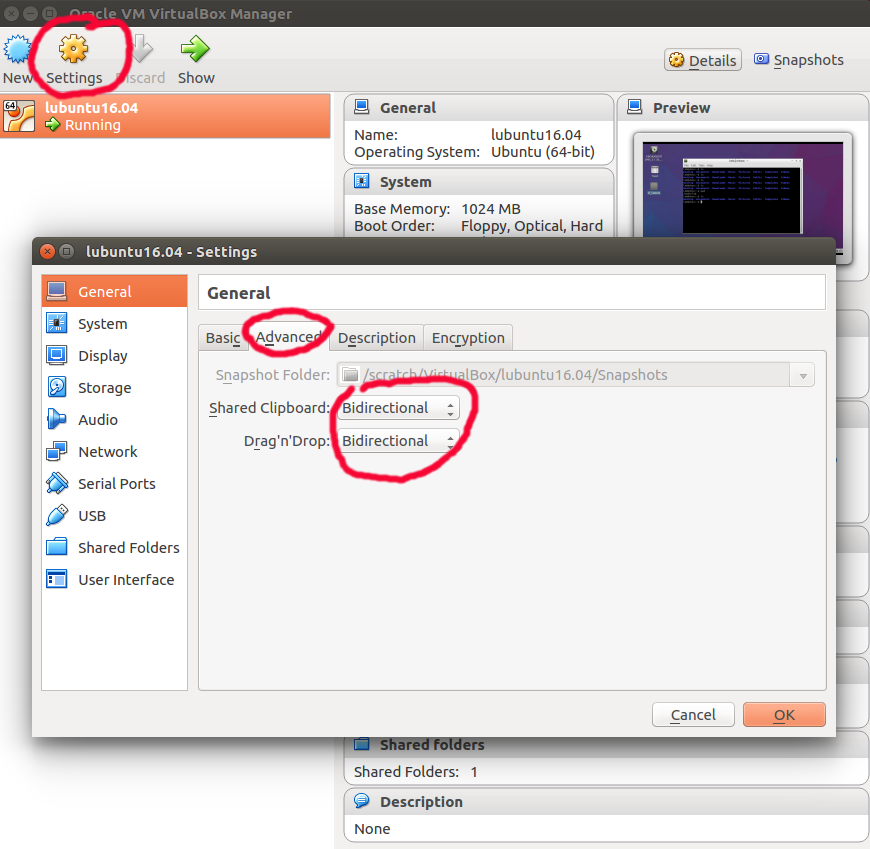
- Enable copy-n-paste between your native OS (e.g. MacOS) and class VM. First, click the settings button in the VirtualBox window, and then click "advanced" tab, change the pulldown button of "Shared Clipboard" and "Drag'n'Drop" to "Bidirectional".

Launch class VM image and log in.
Under the "Devices" menu, click "Insert Guest Additions CD".
Start LXterminal, type cd /media/lab/VBox_GAs_5.2.24/. Become root by typing sudo bash. Afterwards, type ./VBoxLinuxAdditions.run.
 Restart Virtual box and re-launch class VM. Now you should be able to do copy-n-paste between native OS and class VM.
- Mount a folder in native-OS in class VM. (Note that this option requires completing the previous option which installs the virtualbox guest additions.) Instead of writing code in class VM, you may want to write code in your native-OS (e.g. using sublime) and only execute the labs in class VM. In this case, you want to store lab files in a native folder (e.g. /User/jinyang/golabs) and mount the native folder in class VM, so changes made to lab files in native OS are instantly visible inside the class VM.
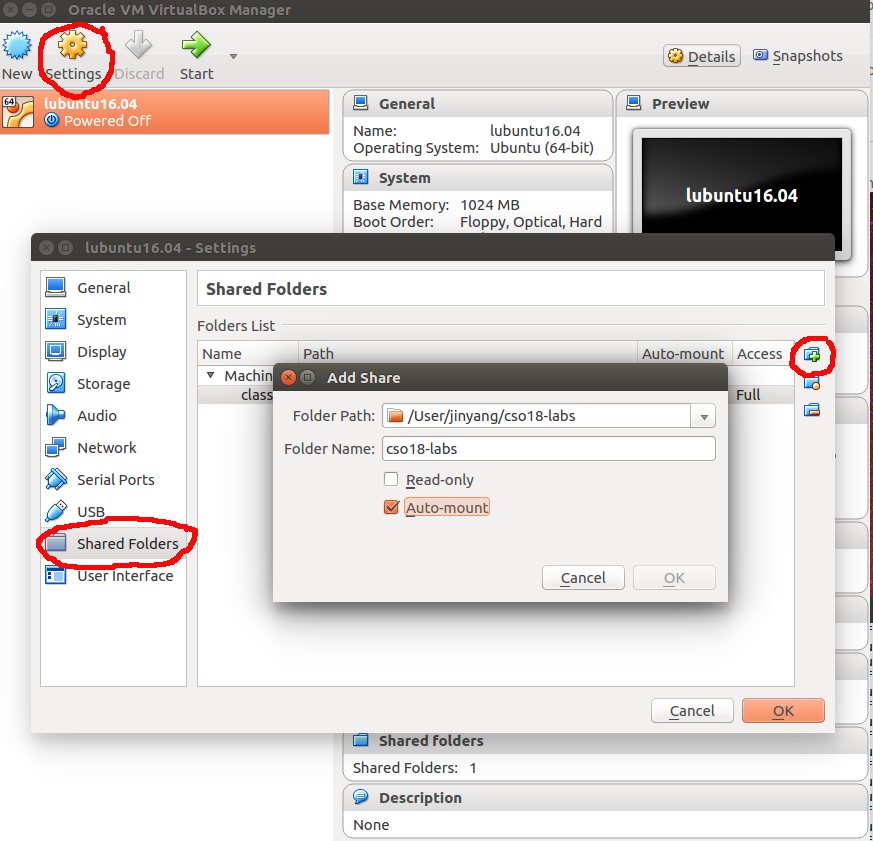
To mount a native folder in class VM, inside VirtualBox, click "Settings" button, and then click "Shared Folders" on the left. Click the add-share logo on the right hand side. Enter the "Folder path" in your native OS (e.g. /User/jinyang/golabs and "Folder name" (e.g. golabs) with "Auto-mount" selected.

Launch class VM, open LXterminal once logged in. Create mount directory by typing sudo mkdir /mnt/golabs. Mount by typing sudo mount -t vboxsf -o uid=1000,gid=1000 golabs /mnt/golabs. From now on, the /mnt/golabs directory refers to the /User/jinyang/golabs directory in your native OS. If you reboot the VM, you will lose your mount. To keep it automatically mounted across reboots, add the following line (as root user) to your class VM's /etc/fstab file by typing:
sudo bash -c 'echo "golabs /mnt/golabs vboxsf uid=1000,gid=1000 0 0" >> /etc/fstab'
FAQs on Virtual Box Setup
-
VT-x/AMD-V hardware acceleration is not available.
Virtualbox wants you to enable virtualization in BIOS. If you don't know how to do that, come to see one of the course staff.
- VM fails to launch and halts with either black screen or distorted image.
You should try to allocate more video memory to your VM. Shutdown your VM first. Then open "Settings", click "Display", and change "Video Memory" to a larger value.
- "Insert Guest Additions CD Image..." fails.
If on your VM desktop, there is an icon that appears like a CD, that means you inserted the CD image already. You cannot insert the CD image twice.
- Mount shared folder fails and get "protocol error".
When you add a shared folder in VM settings, you will specify a folder name. If you folder name is abcdefg, then when you mount your shared folder inside VM, you should change the command to sudo mount -t vboxsf -o uid=1000,gid=1000 abcdefg /mnt/golabs
- When typing in password, nothing happens.
That is a security feature. Terminal won't display your typed password because someone sitting next to you can see it and steal your password. Just continue to type your full password, and hit Enter
- How to resize the VM to full screen?
After you install the Guest Additions CD Image, in the VirtualBox Menu bar, click "View" then "Full-Screen Mode", then wait for a while. The first time switching to full screen requires patience. If it still does not work, uncheck "Full-Screen Mode" and then check "Full-Screen Mode", and wait for a while. Repeat until you run out of patience and decide to give up and use "Scaled Mode" instead...
- The command sudo unable to resolve host.
This is just a warning, you can ignore it. But if you really wants to get rid of the warning message, open up a terminal, type sudo sh -c 'echo "127.0.1.1\tvbox" >> /etc/hosts'
Install Golang
We will grade your labs on an Ubuntu 18.04 machine with golang version 1.13.Log into the class virtual machine and start a terminal by clicking the "LXterminal" icon on the desktop (alternatively, use the short-cut key combination "Ctrl-Alt-t").
Install golang1.13 by downloading this binary package and follow the instructions given here. Make sure you install the latest version 1.13 of Golang. It's been reported that some earlier version of Golang does not work with the labs.
You may skip using VirtualBox and directly install Go1.13 on your MacOS. However, we will not provide any technical support should you encounter any OS-related issues in doing the labs. Furthermore, should the results of your lab differ from what we have obtained by running the tests on Linux, we will use our test results in determining the grade.
Lab Repository Setup
For each student in the class, we have created him/her a corresponding private lab repository on Github.com. You will submit labs by pushing to your private repo on github.com (as many times as you want) and we will collect labs for grading after the lab deadline directly from Github.com. Below are the steps for setting up your the lab environment on your laptop. If you are not familiar with the git version control system, follow the resources here to get started.Cloning your lab repo locally
In a VirtualBox terminal, clone your repo by typing the following:
$ git clone https://github.com/nyu-ds-fa19/golabs-<YourGithubUsername>.git golabs
$ cd golabs
You will see that a directory named golabs has been created under your home directory. This is the git repo for your lab assignments throughout the semester.
Saving changes while you are working on Labs
As you modify the skeleton files to complete the labs, you should frequently save your work to protect against laptop failures and other unforeseen troubles. You save the changes by first "committing" them to your local lab repo and then "pushing" those changes to the repo stored on github.com$ git commit -am "saving my changes" $ git push originNote that whenever you add a new file, you need to manually tell git to ``track it''. Otherwise, the file will not be committed by git commit. Make git track a new file by typing:
$ git add <my-new-file>After you've pushed your changes with git push, they are safely stored on github.com. Even if your laptop catches on fire in the future, those pushed changes can still be retrieved. However, you must remember that git commit by itself does not save your changes on github.com (it only saves your changes locally). So, don't forget to type that git push origin.
To see if your local repo is up-to-date with your origin repo on github.com and vice versa, type
$ git status
Handin Procedure
To handin your files, simply commit and push them to github.com$ git commit -am "saving all my changes and handing in" $ git push originWe will fetching your lab files from Github.com at the specified deadline and grade them.